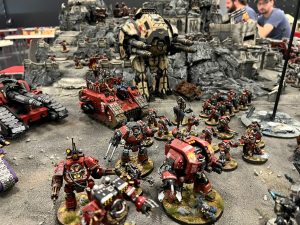
Welcome to Warhammer Tactics! Today, we’re going to be looking at ways we can optimize our gameplay in terms of decisions against skilled opponents.
Almost all of us have an opponent we struggle against playing. If you only play locally, it might be that one guy who’s always playing a very powerful list, trying to do whatever he legally can to get a win. Or, it could just be the local champion, the guy that’s always friendly but definitely knows what he’s doing.
If you’re more of a competitive player, maybe you always find yourself going X-1 at your events, and you can’t seem to find the win at the X-0 table at the end of a tournament. No matter where you fall on this spectrum, keep that person or situation in mind.
We are going to talk about some improvements you can make to your gameplay for these high intensity games. Most, if not all of what we discuss will make far more sense with a real game example. So, we’re going to do just that, and look at a real game played between two competent players.
 That leads me to introduce one of my best friends: Kyle Watson (on the right). Kyle was the #1 Dark Angels player for most of the 2017 ITC (Independent Tournament Circuit) season. He ended up finishing 2nd because he deployed overseas. He’s now back in the USA, and he volunteered to help provide us with a game for us to pull from. We won’t be going over the entire battle today.
Instead, we’ll be looking at some critical points in the fight and discussing the tactics at play. To begin, we’ll look at the lists that both of us played, along with the deployment. Then we’ll delve into some critical moments and the tactics I used to address them, that way you can learn from a firsthand gameplay experience for things to keep in mind while playing your games of 40K.
 Kyle was playing a somewhat changed version of Tony Kopach’s NOVA winning list. It’s one of the most powerful lists in the game, and Kyle’s version is just as lethal. It has nearly infinite command points coupled with long range, high mobility fire power from a Castellan. It also has a couple of Blood Angel Captains with Thunder Hammers to drop in for spot removal. Kyle’s version includes 3 Artemis Pattern Hellhounds and a couple of Helverins for extra mobile firepower. The Hellhounds are a Forge World unit that, when they die, have a chance to explode on 4+, and they do D6 Mortal wounds within 6” on explosion. Effectively, they provide area of effect removal that ignores most defenses on a cheap platform. He’s only recently made it back to the states, so we had to proxy a lot of his list.
 I was playing my regular, for fun, 2000 point Emperor’s Children list. It has a lot of Noise Marines and Psychic Powers, along with 3 Maulerfiends and a unit of Obliterators for heavy lifting. I deliberately did not play a highly competitive list. This is because that, although list construction is very important, tight gameplay is what will make the biggest difference in your games. To demonstrate that, I chose to play a severely sub-optimal list against one of the best lists in the game. This way, we can demonstrate just how important gameplay decisions are compared to list construction. Now that the armies are set, let’s look at the battlefield and deployment.

 There’s a few things to talk about with deployment, so we’ll just go through them one at a time:
Know How You Lose The Game
Most players will quickly formulate a gameplan when they set down to play a game. However, it’s just as important to recognize what will make you lose the game. For example, if you look at the deployment you’ll see that we randomly generated Hammer and Anvil.

That’s really bad for me, as I’m a rather low range army and my opponent is not. So, if I sit back or take my time, I’m going to lose, since my opponent can just shell me with Helverins and the Castellan turn after turn. This meant that in order to not lose, I needed to close the gap and take the fight to him, ideally getting a Maulerfiend or two into melee with the Castellan to cut it down to size.
Once you identify what makes you lose the game, don’t forget it. Keep it in mind, and keep playing to prevent that scenario as much as you can, while also pursuing your main gameplan.
Deny Your Opponent When You Can:
This isn’t strictly tied to deployment, so it will come up again. In general, you should always be looking for opportunities to deny your opponent the ability to do something. For example, I had a Chaos Sorcerer with a Jump Pack with two important powers. I needed him to get at least one, maybe two rounds of casting off. So, I deployed him in reserves with the intent to drop him in turn one. This prevents my opponent from shooting him with a Shieldbreaker Missile on his first turn, if my opponent goes first. He actually ended up going second, but did kill my Sorcerer with his first Shieldbreaker Missile. Had he gone first and had I deployed that Sorcerer, he would have almost certainly died and done nothing, which would have been very bad for me.
Identify Who Will Probably Be Going First:
This is pretty par for the course for more experienced players, but you should know who’s probably going to be going first before the first deployment is made. Whoever has less deployments has about a 60% chance of going first, which is a significant boost. For example, in my game I was probably going to go first. Between the fact that I knew I needed to apply pressure fast, and that I was probably going first, I put as much stuff on the line as I could. Normally this would be a rather aggressive deployment, even with the chance to go first, but for this game I didn’t have a choice.
Let’s move on to the end of the first turn. Take a look at this giant unit of Noise Marines, circled in red. Then, look at where the same unit of Noise Marines ended up at the end of turn 2. Keep in mind that I did not advance or Warp Time them to achieve this huge distance.

Master The Charge And Fight Phases:
This is one of the most important things that we’ll cover today. The rules for Charging, Piling In, and Consolidating allow for a lot of lateral movement. For Charges, the only restriction is that the first model you move has to make it in. Everyone else is free to move however you like, as long as you maintain coherency. Pile In’s and Consolidates just require you to end up being closer to the closest model than you began.

I charged the Captain (small red arrow) and a Scout (small teal arrow) with my unit of Noise Marines. With a decent charge roll, I was also able to claim an objective by moving some of the unit towards the objective, not the charge target. It takes a lot of practice, but mastering how to squeeze every last inch of movement that you can get will drastically improve your gameplay. It’s a skill that requires a lot of hands on practice, but it’s worth its weight in gold to master.
Acknowledge And Learn From Your Mistakes:
Nobody is perfect. You’re going to make mistakes, and that’s okay. But, you need to learn from them. Let’s look at a photo from a little later in the game, revolving around the same combat we just talked about.

It’s a little hard to see, but I’ve killed the Scout and tied up the Captain(red arrow). This isn’t a horrible line of play, as it allows me to force Kyle to either Fall Back and do nothing with his Captain, or risk getting punched to death in melee. Noise Marines have 2 attacks baseline, and because I’m playing Emperor’s Children I always strike first, which meant staying in combat was very risky.
However, I had a better line of play. I could have minimized the attacks that I put on the Scout, and tried to leave him alive. Had I done that, I could have pinned the Scout instead, and kept my Noise Marines safe since I would have almost certainly killed the Scout on my opponents Fight Phase. For those that don’t know, pinning is the technique of using Pile In and Consolidate moves to surround a single model without attacking that model, preventing them from falling back.
This keeps you stuck in combat, where you can then kill the enemy unit in melee, and be free on your own turn. Had I done so, it would have denied Kyle the ability to shoot either unit of Noise Marines. Because I failed to do this, he wiped the entire bottom unit out. There was actually a second opportunity later in the game where I could have pinned him again and also failed to, which let him wipe the other unit out. Had I successfully done both pins, I almost certainly would have won the game, as the score was pretty close already.
We’re going to zip ahead to the end of the game, which was my Turn 5. At this point, the score is 17-20, and both of us are almost tabled. I have a Demon Prince and a Sorcerer on a Bike who’s hiding behind cover (arrow is pointing to his approximate location). Kyle has his Castellan, a Helverin, and a single Hellhound hiding behind some terrain.

Play To The Mission, Play To Your Outs:
We’re going to cover two different subjects at once, since the subjects are fairly related. “Play To The Mission” means to always focus on doing what the Mission requires of you to win the game, and not just tabling your opponent. “Play To Your Outs” means to keep in mind all of your options, even the unlikely ones, and to remember to utilize options when you need them.
Case in point: Kyle and I were playing an ITC (Independent Tournament Circuit) mission. ITC missions allow you to choose your secondaries, and your secondaries actually make a significant portion of your score. Because of the secondaries that I chose, I would score points for damaging the Castellan, and another point from a different secondary for killing it. Since the Castellan was at full health, I could have theoretically earned up to 5 points if I was able to kill it. I was down by 3, and it was near the end of the game, so this would have put me in a commanding lead at a critical point. I played to the mission, and decided I would try to kill the Castellan.
All I had left was my Demon Prince and a Sorcerer, so I would have to get creative with what I did to try to accomplish this. My plan was to cast Prescience on my Demon Prince along with Diabolical Strength. Prescience wouldn’t actually increase my accuracy since I already hit on a 2+, but it would make it more likely for me to get bonus attacks from Death To The False Emperor. Diabolical Strength made it more likely I would wound, and gave me another bonus attack. Between this power combination and a Smite from my DP, it was very likely I would get the damage I needed to get 4 points, but unlikely to kill the Castellan for the 5th.
However, it was my best line of play, and it utilized everything I still had remaining, which is a perfect example of “Playing To Your Outs”. Unfortunately, my Sorcerer killed himself with a Perils of the Warp, so I was unable to get the points I needed. I ended my turn with the score tied 20-20, but after Kyle took his turn and tabled me, we finished the game out at 20-26, Kyle’s Victory. This brings me to my last point, and the most important one.
Losing Is Learning:
Losing a game is one of the best ways to learn and improve as a player, as long as you focus on learning and improving. You can do games of 40K, or frankly anything else for that matter, and after a point you’ll stop improving unless you focus on improving. And one of the best ways to improve is to play games like against difficult opponents, and lose. Remember that person I told you to keep in mind? Play against them, and then keep playing against them. Focus on your movement, your utilization of your options, your mastery of the Charge/Fight phase, everything else we talked about here. Keep losing and learning until, one day, you overcome that adversity, and get the win.
Well, that wraps us up for this Warhammer Tactics! Hopefully you have some food for thought as to how you can improve your gameplay based on what we talked about today. Make sure to check in next week, when we go over the Charge and Fight phase in full detail. We’ll be covering everything you can to optimize your close combat, and how to do it!
Warhammer 40k Winning Lists June 11th Edition
With summer in full swing, we see a refreshing number of tournaments kick back up globally, ranging from 3 to 7 rounds
