Today, we have a slightly different style of tactics article for you. We’re going to be looking at an army construction method that you can breathe new life into your army of 3+ save models, regardless of if you play Necrons, Space Marines, Death Guard, or any other army with lots of 3+ save models. We aren’t going to make you win the next GT you go to with these tactics, but you will definitely be able to play with these guys in your local games or events with added confidence and success. Even a highly competitive player may benefit from this article since it can give them some new ideas for a pet army they’re playing around with.
The Crunch
Before we dive in, we need to discuss just a bit of math and game theory to explain a couple things. Imagine that you have a unit taking 36 saves, and we live in a weird alternate reality where everything random is always perfectly average. This means we would get 6 1’s, 6 2’s, etc.
As we all know, how many saves we pass is primarily determined by what our Save is. We also factor AP, but for now we will assume it’s AP0. Given our perfectly average roll, this means we would pass 6 saves on a 6+ save, 12 on a 5+, all the way up to passing 30 on a 2+ save.
As you can see, every step we improve on our save, we turn 6 failures into 6 more successes. When discussing damage taken, we are concerned with the number of saves failed, not passed, as failed saves directly result in damage.
Put all this together, and you reach the conclusion that the most impactful save improvement is to go from a 3+ to a 2+, since we move from 12 failures to 6 in our little hypothetical save batch, a whopping 50% reduction. Alternatively, if you go from a 6+ to a 5+, you only get a 20% reduction since you go from 30 failures to 24. These are two extremes, but the important idea to remember is that bonuses to saves are more impactful the better your save already is, up to hitting 2+ since 1’s always fail.
How To Best Do This
Now, there are a couple different ways to improve the Save of a model, but the most universal is Cover. Anybody can get it by just standing in terrain, as long as you can fit the entire unit in it. That can be difficult to consistently acquire in a real game situation however, and sometimes the Cover isn’t in a position that’s beneficial to you due to the current board state.
And that is where our secret technology for everyone here today comes in. I present to you: The Aegis Defense Line! Let’s check out what we’re working with.

At 75 points, the Aegis Defense Line (here after ADL) is fairly cheap and non-invasive in most lists point wise. It does eat up a detachment all on it’s own, so this won’t be a good tactic for most highly competitive armies since they typically use all 3 detachments. But, if you’re just trying to get some success with your favorite army that doesn’t use much in the way of any allied forces, you won’t notice the loss of a detachment or a measly 75 points.

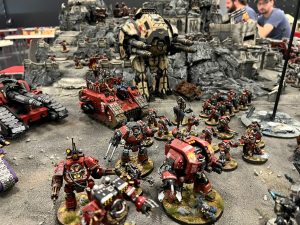
So, what does the ADL actually do? Essentially, it lets you bring your own terrain to the table and guarantee that your INFANTRY units can always benefit from Cover. This is most impactful on a model with a 3+ save because of the reasons we already discussed, and the ADL is going to form the bedrock of how we approach our list construction. Take a look at this picture here, taken straight out of a Nights At The Game Table Battle Report.
How To Best Utilize The ADL

Imagine placing the ADL where the green line is drawn in this picture. The ADL is much longer than this, but we’re using a simple example to illustrate. The ADL is “bridging” these two pieces of area terrain, effectively creating one long strip of terrain where you can claim that precious Cover on your 3+ models, represented with the yellow line. They will either be standing behind the ADL, or they’ll be in the ruins/building to claim it naturally.
This is the basic concept we will be building off of. With smart placement of your ADL, you can bridge 2 and sometimes even 3 pieces of terrain (it’s almost 30” long fully stretched, and you don’t need to perfectly bridge the terrain)to create a massive strip of the table where you will always be guaranteed Cover. From here you can control the board, since you can move across your “bridge” to respond to your opponent while you dominate them in fire fights. You will always have your fire support within 1” of the ADL and your opponent usually will not, so the ADL will only work one way, and that’s YOUR way.
The exact units and combinations that you pair with your ADL “bridge” are heavily dependent on what army you are playing, but typically INFANTRY with good guns are the name of the game here, and bonus points if they are also mobile. It’s also important to bring along a couple units to run objectives or that punish your opponent for castling up. A full gun line behind your “bridge” will simply bog down the game since most players won’t initiate that fire fight.
In Conclusion
This tactic is not perfect by any means however, and you should be wary of its weaknesses. For one, the ADL doesn’t do jack against primarily melee armies, which means you aren’t getting the same value out of this you normally would. In addition, some armies have guns with comically long ranges or that don’t require line of sight, and they can bomb you out of your bridge. Finally, units that ignore Cover can hurt this strategy, with Tau being at the forefront since they can ignore Cover with a few markerlights.
Despite these weaknesses, the ADL can give many 3+ save armies that struggle on the tabletop the staying power they need to grind the opponent out over multiple turns while controlling objectives and pressuring the opponent. Pick one up or borrow one from your Local Friendly Game Store, and give it a shot!
You can also become a member and get access to exclusive battle reports, painting tutorials, and tactics by clicking the link http://page.nightsatthegametable.com/membership…


